Barbecues Peka
Discover unique recipes for a traditional taste with our Peka barbecues, a true delight.
Frequently Asked Questions
What are the differences between the stainless steel bell and the forged iron bell?
1. Material and weight :
Stainless steel : Lightweight material, making it easier to handle and transport. It is resistant to rust and corrosion, and does not require special care.
Forged Iron : Heavier material, which makes it more stable and durable. Forged iron is more prone to rust if not properly protected and maintained, but it has excellent heat distribution properties.
2. Heat Distribution and Retention :
Stainless steel : Heats up faster but does not retain heat as well as forged iron. This can lead to uneven cooking if the temperature is not carefully controlled.
Forged Iron : Distributes heat evenly and retains it longer, making it ideal for slow cooking. Perfect for low-temperature cooking and long preparations, such as cooking under a bell.
3. Rust and Corrosion Resistance :
Stainless steel : Extremely resistant to rust and does not require special maintenance beyond regular cleaning.
Forged Iron : More prone to rust, especially if not properly maintained (for example, by coating it with oil). It requires regular care to preserve its protective patina.
4. Durability and Longevity :
Stainless steel : Durable, but may scratch or lose its shine over time. Although resistant to rust, it is generally not as long-lasting as well-maintained forged iron.
Forged Iron : Extremely durable and often passed down through generations. With proper care, it can last decades, even centuries.
5. Price :
Stainless steel : Generally more expensive than forged iron due to its rust resistance and ease of maintenance.
Forged Iron : Less expensive but requires more attention for upkeep.
6. Maintenance:
Stainless steel : Easy to clean and maintain, with no special coating required.
Forged Iron : Requires regular maintenance with oil to prevent rust. It should not be washed in a dishwasher, and hand drying is often recommended.
7. Use in Cooking :
Stainless steel : Suitable for faster cooking and foods that do not require long heat retention.
Forged Iron : Ideal for slow cooking, braising, simmering, and dishes that require even heat distribution.
In summary, the stainless steel bell is lighter, easier to maintain, and ideal for quick cooking, while the forged iron bell is heavier, more durable, and perfect for slow and even cooking, though it requires more care.
How to succeed with my recipe?
1. Preparation of Ingredients :
Meat: Choose high-quality meat. Lamb, veal, chicken, and even fish are commonly used. Cut the meat into appropriately sized pieces and season it with salt, pepper, rosemary, olive oil, and garlic. Let the meat marinate to absorb the spices.
Vegetables: Traditional vegetables for cooking under a bell include potatoes, carrots, onions, zucchini, and peppers. Cut the vegetables into large chunks, as they cook more slowly.
Fat and Spices: Olive oil is essential for enriching the flavor, but you can also replace it with lard. You can add herbs such as bay leaf, rosemary, and thyme. Garlic and wine can also add excellent flavor.
2. Preparing the Fire:
Fire: The right temperature is key. Start the fire in advance and let it burn long enough to create a large amount of embers. The embers will provide even heat during cooking. The oven should be well heated.
Ember Distribution: Place some of the embers on the bell lid and distribute the rest under the dish. It's important that the embers aren’t too hot to avoid burning the dish, but they should maintain a constant temperature.
3. Arranging the Ingredients in the Bell :
At first, place the meat at the bottom of the dish, as it takes longer to cook, and arrange the vegetables on top. If you're using large pieces of meat, you can place them directly on the embers beneath the bell, while the vegetables and smaller pieces should go on top.
After 45-50 minutes, move the meat to the top of the dish, the vegetables to the bottom, and let it cook for another 30-40 minutes.
4. Water and Wine :
Add a small amount of water or white wine to create steam and keep the dish juicy. The liquid will help cook the vegetables and meat evenly without drying them out.
5. Cooking Time :
Cooking under the bell takes time, between 1.5 to 2 hours, depending on the type of meat. Don’t lift the lid too often, as it will lower the temperature inside. The meat should be tender, and the vegetables golden and caramelized.
It’s important to seal the bell with embers around it to prevent air from entering. This helps maintain a constant heat and encourages cooking in its own steam, preserving the tenderness and flavor of the food.
6. Checking the Dish :
After about 1.5 hours, gently check the dish by lifting the lid. The meat should be tender, and the vegetables well-cooked and fragrant. If the meat is not yet cooked, cover it again and let it cook a little longer.
7. Resting the Dish :
Once the dish is cooked, let it rest for 10-15 minutes under the bell before serving. This will allow the flavors to meld together and make the dish juicier.
8. Final Check and Serving:
Before serving, adjust the seasoning if necessary and add salt or spices to taste. Serve the dish with homemade bread, wine, or a salad.
Managing the heat well and being patient are the keys to successful cooking under the bell.
What is the delivery time?
The delivery time depends on the shipping method and the destination country. Since our peka are handmade by artisans, this may sometimes take a little longer. If the delivery time exceeds 5 days, we will keep you informed so you are updated on the progress of your order.
How can I contact you?
You can contact us by phone or through the contact form. We will respond to you as soon as possible.
How can I learn more about you?
You can explore other sections of this website, such as the "About Us" page or our blog, to learn more about our company, our mission, and our team.
Do you need to use a tripod?
No, there are two approaches: On one hand, some people place the dish and the "bell" on a flat surface (such as refractory bricks from your barbecue, for example). In this case, it’s important to surround and cover the base with embers to prevent air from entering under the bell. On the other hand, you can use a tripod and cover your dish, while also being careful not to open the bell too often, as this will affect the flavor of your dish.
The technique of cooking 'under the bell'
The cooking under the bell, or "ispod peke"/"ispod sača," is an ancient method of food preparation deeply rooted in the tradition of many Mediterranean and Balkan regions, especially in Croatia, Bosnia and Herzegovina, Montenegro, and Serbia. The "sač" (or "peka") is a metal or clay bell-shaped lid used to cook and roast food over an open fire. This cooking method imparts a unique taste, texture, and aroma to dishes, as it uses natural heat sources and an enclosed space for cooking. Here's a detailed description of how cooking under the bell works:
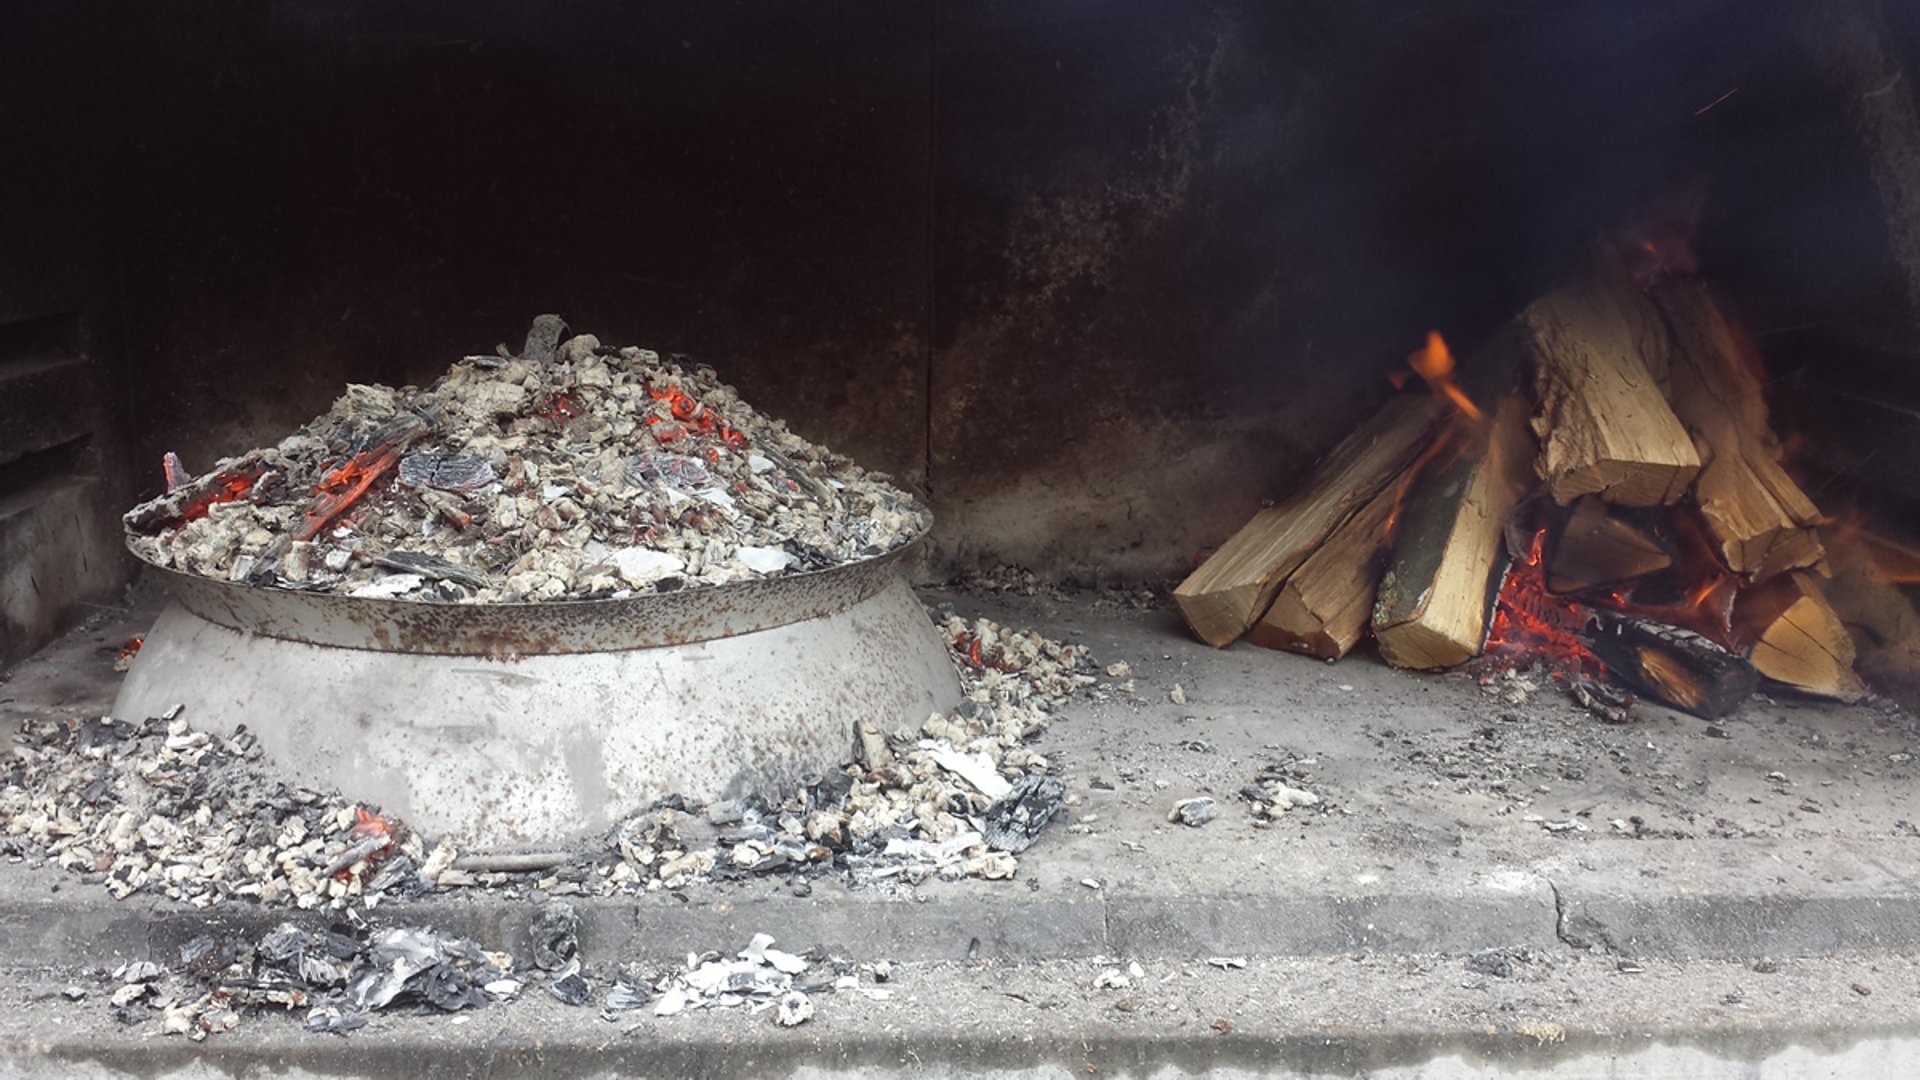
1. Preparing the Fire and Embers
The Fire: Cooking under the bell begins with preparing the fire. Wood is placed on the ground or in a hearth and lit to create a large quantity of embers. The wood used must be dry and of good quality, such as oak, olive, or beech, as it produces durable and powerful embers.
Creating the Embers: The fire must burn long enough to leave only embers behind. These embers are essential because they ensure the even heat required to cook the food under the bell. The embers must be strong but not too intense, as overly hot embers may burn the food.
2. Preparing the Food
Ingredients: The dishes most often prepared under the bell include meat (lamb, veal, chicken), potatoes, vegetables, and even baked goods like bread and flatbreads. The meat and vegetables are usually seasoned with salt, pepper, garlic, rosemary, and olive oil, and sometimes a little wine or water is added to keep the food juicy.
Arrangement in the Dish: The food is placed in a large metal or ceramic dish (or on a stone for bread), which is set on the embers. The dish is lightly greased with oil or lard to prevent the food from sticking. Vegetables are placed at the bottom, and the meat is placed on top so that the juices from the meat soak into the vegetables during cooking.
3. Setting Up the Bell (peka)
The Lid: Once the food is ready and arranged in the dish, it is covered with the preheated "sač." The bell is a metal lid shaped like a dome, with a handle on top, which is placed over the dish or bread to create an enclosed space for cooking.
Embers on the Bell: After placing the bell, glowing embers are placed on top of the lid and all around it. This ensures that heat comes from all sides: from below (from the embers on the ground) and from above (from the embers on the lid). This process allows for a cooking method similar to that of a convection oven, where the food is cooked evenly on all sides.
4. Cooking and Roasting
Duration: The cooking time varies depending on the type of food. Meat dishes usually cook for 1.5 to 2 hours, while bread or flatbreads are ready in about 30 to 40 minutes. It is important to regularly monitor the amount of embers and add more if necessary to maintain a stable temperature.
Heat Balance: If the embers are too strong, there is a risk that the food will cook too quickly on the outside and remain raw inside. On the other hand, if the embers are too weak, the cooking process will be prolonged, and the food may become mushy. This is why maintaining a thermal balance and regularly checking the food is essential.
5. Finishing the Cooking
Checking: After the recommended cooking time, the bell is carefully lifted to check the food. The meat should be tender, with a crispy crust on the outside, and the vegetables should be well-cooked and aromatic. The bread baked under the bell should be golden brown with a crispy crust.
Removing the Food: When the food is cooked, the dish is removed from under the bell, and the food is served directly from the dish. When lifting the bell, caution is needed because the embers are on top, and the lid is very hot.
6. Unique Taste and Benefits
Smoky Flavor: Cooking under the bell imparts a unique smoky flavor to the food, thanks to the fire and embers. The meat remains extremely juicy inside while developing a crispy crust on the outside. The vegetables absorb the meat juices, giving them a rich and distinctive flavor.
Outdoor Preparation: Due to the use of an open fire, cooking under the bell is often done outdoors, in courtyards, or during gatherings, adding a social and traditional dimension to the whole process.
Examples of Dishes Cooked Under the Bell: :
Lamb with Potatoes: A classic dish made with lamb and potatoes seasoned with salt, pepper, and rosemary, cooked until the meat is tender and the potatoes are golden.
Veal under the Bell: Veal, seasoned and cooked slowly until it becomes tender and juicy.
Bread under the Bell: A traditional homemade bread that, thanks to cooking under the bell, develops a crispy crust and a soft interior.
Conclusion :
Cooking under the bell is not just a method of cooking, but a true cultural experience. It requires time, patience, and skill, but the reward is food with exceptional flavor and texture, impossible to achieve with modern ovens. This preparation method connects people to nature and tradition, offering a special sense of conviviality and enjoyment when tasting simple yet flavorful dishes.
The maintenance
1. Peka in Stainless Steel
A stainless steel (INOX) peka is a bit easier to maintain compared to one made of wrought iron because it is less prone to rust. However, proper maintenance will ensure its longevity and better performance. Here’s how to care for a stainless steel peka:
First use:
Before the first use, wash the peka with hot water and a mild detergent.
There is no need to grease it like with wrought iron, as stainless steel doesn’t rust, but oil can improve cooking by preventing food from sticking.
Cleaning after use:
After each use, let the peka cool down.
Wash it by hand with hot water, a mild detergent, and a soft sponge. Stainless steel is resistant to most soaps, so there is no risk of damaging the surface.
If food residues remain, you can soak them in hot water and gently scrub. For tougher dirt, you can use a paste made from baking soda.
Avoid scratches:
Stainless steel is a durable material, but avoid abrasive sponges or products that could scratch the surface.
Do not use metal scrapers, as they could leave permanent marks on the surface.
Drying:
After washing, dry it thoroughly to avoid water or lime stains, especially if you have hard water.
Storage:
Store the peka in a dry place. Although stainless steel doesn’t rust, it’s advisable not to leave it in a damp environment for long periods.
Maintaining shine :
You can occasionally use pastes or special products for stainless steel to keep its shine and smooth surface.
Stainless steel is a very durable material, and with minimal care, it can last for many years. It is easier to maintain compared to other materials like wrought iron.
2. Wrought Iron Peka
A wrought iron peka requires proper maintenance to last long and retain its qualities. Here are some care tips :
First use :
Before the first use, wash the peka with hot water and mild soap, then dry it thoroughly.
Coat the entire surface with a thin layer of oil (vegetable or olive oil) to create a protective patina that will prevent rust.
Cleaning after use :
After each use, allow the peka to cool completely.
Never use harsh detergents or metal sponges, as they can damage the protective coating.
Clean it with hot water and a soft sponge. If stubborn residues remain, let them soak in water.
If food has stuck to it, you can use a wooden spatula to remove it.
Drying and oiling :
After washing, dry the peka well with a cloth or leave it to air dry.
Coat both the inside and outside with a thin layer of oil to prevent rust.
Storage:
Store the peka in a dry place.
If you don’t use it for an extended period, occasionally check that it is well-oiled.
Rust protection :
If rust appears, you can gently remove it using steel wool or sandpaper, then wash, dry, and re-coat with oil.
Regular maintenance will prolong the life of your peka and ensure you prepare delicious meals every time!
Peka Tradition
Discover our traditional locally made barbecue.
© 2025. All rights reserved.
Peka Tradition Webshop
BOULEUMA j.d.o.o.
MBS: 110150987
OIB: 51010117689
Šibenik, Hrvatska
Kontakt broj/Contact
+385 99 698 4953
contact@pekatradition.com